
Started April 24, 2004
The leading edge of the wing is rounded but the curve is a little too sharp to just place the skin on and bend it around the nose ribs. Therefore, the leading edge of the skin must be pre-formed a bit to make a better fit. The older Beartracks newsletters had you using a 2 x 4 and a bit of carefully applied force to a piece of bent over skin. It worked but was easy to accidentally make a permanent crease and wreck your wing skin.
Later, a new version of the leading edge forming came out in the newsletters. It involves some 1 1/2" PVC pipe and a vacuum cleaner.
Here is a photo of the set-up before adding vacuum:
Once everything was sealed, the PVC was double checked for centered and straight and the vacuum was applied to the PVC pipe opening. Within about 30 seconds the skin will look like this:
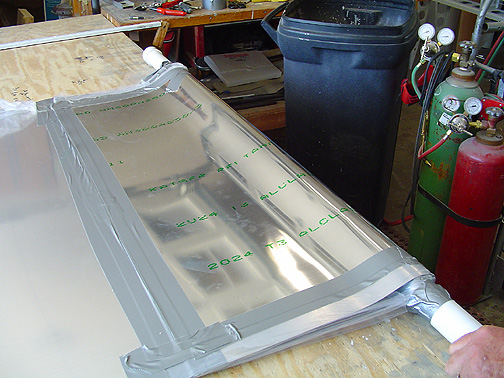
Pay no attention to the torches. They are just stored there for now and played no role in the forming of these skins.
As you can see, the skin looks quite flat. The leading edge will pull slightly away from the PVC pipe but don't worry, it will turn out fine.
After removing the vacuum and the wrapping, the skins will will have a nice rounded bend and the 17" portion will stand up at about 80 to 90 degrees. At this point the skin can be placed on the leading edge of the wing skeleton and be strapped in place:

I used these ratcheting tie down straps when I built my RV-6A wings and they work great for this wing as well. You will notice that a piece of scrap wood was used to help push the skins against the ribs a little better on the bottom side of the wing. Also, a couple of 4 x 4 were used as spacers between the rear spar and the tie-down straps to prevent bending the wing skin at the bottom.
Each skin was placed on the wing skeleton and strapped down. Once satisfied that the skin was properly positioned and square, the rib locations were marked on the inside. Using a Sharpie Felt Marker, I reached inside through the lightening holes and traced the actual ribs and spars onto the skin as shown below:
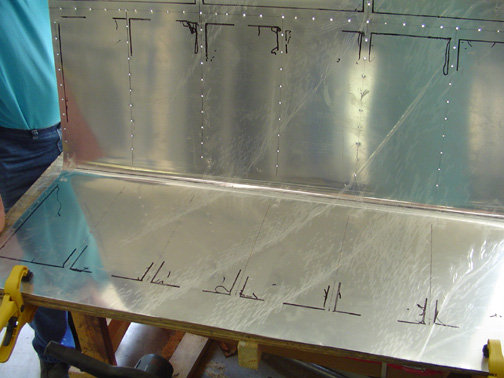
At this point, the nose ribs can be moved back and forth at the leading edge but are fixed where they attach to the spar, so I only marked them at the spar.
Once I had the skeleton traced to the skin, it was removed and placed on the worktable. Using a carpenter's square, the nose rib rivet lines were drawn on the skin at exactly 90 degrees to the spar and centered on each rib. The spacing was laid at 1 1/2" and the holes were pre-drilled in the skin. In the picture above, you can see that I have already drilled the rivet holes on the top side and the holes are laid out on the bottom ready for drilling.
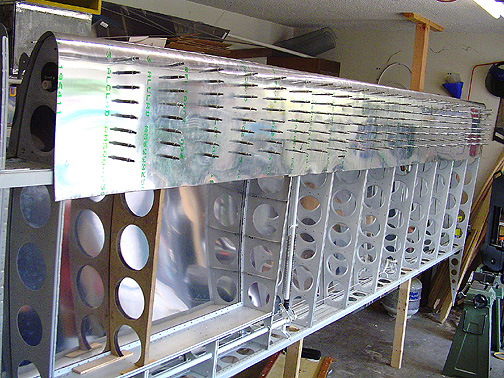
With skin back in place, the ribs could be nudged one way or the other until the previously drawn lines can be seen in the pre-drilled skin rivet holes. Starting at the top and working down, drill and cleco the skin to the ribs. To pull it down evenly, we drilled the top row of holes all the way across, then the next row, the next row and so on until reaching the spar.
Here is a picture of the top skins in place:
Next the bottom skins will be fitted and drilled in place.
Click here to go to Wing Skinning page 2
Click here to go to the Wings Index page
Click here to go to the Home Page